Rutherford experiment
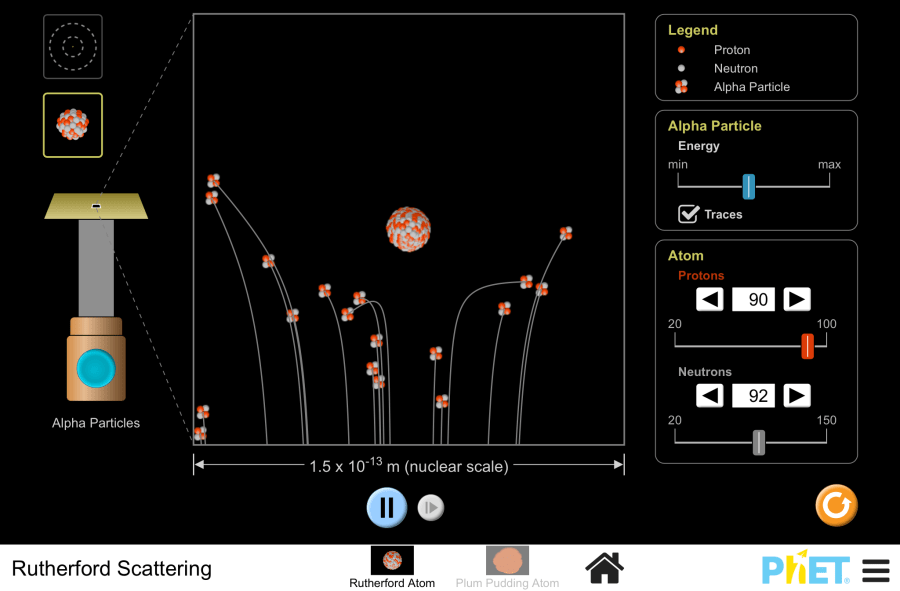
Rutherford Scattering by PhET Interactive Simulations, University of Colorado Boulder, licensed under CC-BY-4.0 (https://phet.colorado.edu) Project title: Rutherford experiment This virtual laboratory is intended for use in chemistry classes on the following topics: Goals: Practical part Replicate Rutherford’s experiment to understand the structure of an atom. 2. On the screen, you can see a thin gold foil, an enlarged image of its atom as a “plum pudding” with electrons like “raisins”. In the top right corner of the screen is the “Legend” section, which shows the components of the atom. In the “Alpha particle” section, you can adjust the intensity of the alpha particle bombardment by moving the slider to the right or left. 3.Initiate alpha particle bombardment. Set the intensity to maximum. Enable the “Traces” option to track particle trajectories. Analyze the particle deflections. Repeat the bombardment with minimum intensity. Observe any particle scattering. What about the case when particle bombardment is at its lowest intensity? 4. Switch to the “Rutherford atom” mode, which represents the planetary model of an atom. In this model, the massive, positively charged nucleus is located at the center, surrounded by electron energy level orbitals. 5. The simulation allows observation of the experiment at both the multi-atom and nucleus levels. In the “Atom” section, you can modify the nuclear composition by adjusting the number of protons and neutrons. 6. Set the number of protons and neutrons to their minimum values. Bombard the atoms with alpha particles. 7. Repeat the previous step with the maximum number of protons and neutrons. 8. Questions: Conclusion In this activity, students explored the Thomson and Rutherford models of the atom, followed by a virtual experiment that simulated Rutherford’s experiment.
Rutherford experiment Read More »