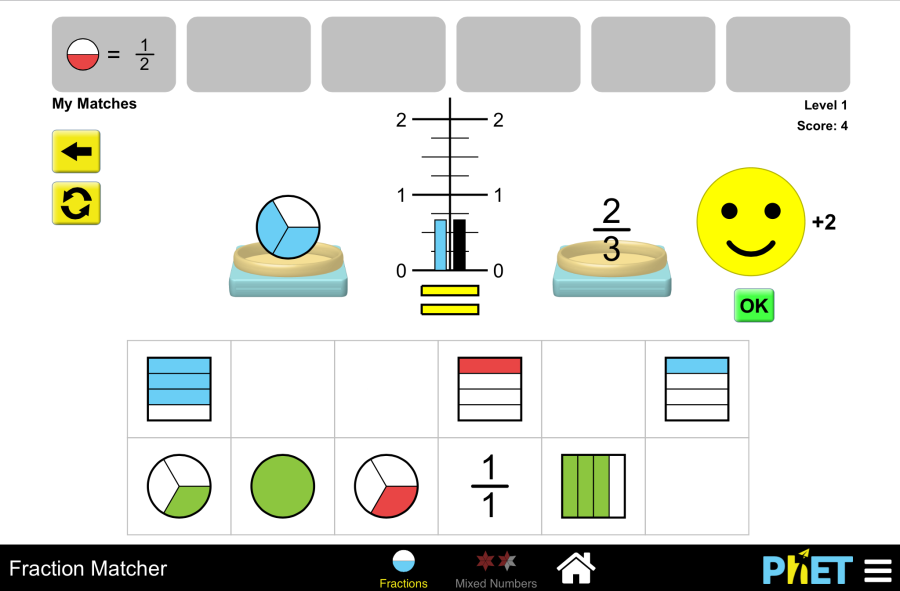
experimentum.kz

Virtual math

Fraction Matcher

Objective: This virtual activity is designed for use in mathematics lessons on the following topics Theoretical part Ordinary fractions are numbers represented as fractions where the numerator and denominator are integers and the denominator is not zero. Writing a fraction: Example: Meaning of the fraction: Example: Types of fractions: Example of a mixed number: Writing a mixed number: Converting fractions to mixed numbers: Virtual experiment “Fraction Matcher” virtual activity teaches students to find and match matching fractions using numbers and pictures. Performs fraction calculations in a fun way to easily master the topic of simple fractions. Match the same fractions using different numbers and fraction representations. Course of work: Section 1: Play with correct and incorrect simple fractions Step 1. Start the simulation: You will be presented with 2 different modes: “Fraction” and “Mixed Numbers”. Open the “Fraction” section. Step 2. In the work area you will be presented with 8 different levels of problems. Levels 1-2 use only fractions smaller than 1. Levels 3-6 use fractions smaller than 2. Levels 7-8 use only fractions greater than 1 and less than 2. Step 3. Open the first level. In the work area, you will see  Step 4. Bring any fraction to the scales by left-clicking and dragging it. Step 5. Among the remaining fractions, find a fraction that is equal or proportional to the fraction on the scale. Place it on the second weight.  Step 6. Check for correctness by clicking on the “Check” button. If the fractions are equal, click “OK” and perform the next alignment. If there is an error, click “Try Again” and compare the fractions from the beginning.  Step 7. Complete the tasks in a level and move on to the next level. Section 2: Mixed Numbers Game Step 8. Open the “Mixed Numbers” Section. In the workspace, you will see 8 different levels of problems. Levels 1-6 use less than 2 mixed number fractions. Levels 7-8 use more than 1 and less than 2 fractions. Step 9. Open the first level. This section also introduces the work area as in the first section. Here you will do problems with mixed numbers. Step 10. Move any fraction to the scales by left-clicking and dragging. From the remaining fractions, find one that is equal to or proportional to the fraction on the scale. Place it on the second scale. Step 11. Check your work by clicking on the “Check” button.  Step 12. Complete the tasks of one level and move on to the next levels.  Conclusion  In this simulation, students worked on fraction-related game tasks to further explore the topic of fractions. They used the basic property of fractions to reduce fractions, compare fractions, and make fractions equal to each other.

Fraction Matcher Read More »

Numbers. Counting objects

Objective: This virtual activity is designed to be used in 1st grade math lessons on numbers, counting objects. Theoretical part What are numbers? Numbers are special symbols that we use to indicate the number of objects. There are 10 numbers: 0, 1, 2, 3, 4, 5, 6, 7, 8, 9. How do you learn to count? To learn to count, you must Memorize the names of the numbers: 0 (zero), 1 (one), 2 (two), 3 (three), 4 (four), 5 (five), 6 (six), 7 (seven), 8 (eight), 9 (nine). Know how to show numbers with your fingers: Practice counting: Virtual experiment The “Counting Objects” Simulator allows students to become familiar with and explore numbers. By displaying numbers and pictures on the screen, students can easily learn to count objects visually.  Course of work: Part 1. Working with numbers 1-10 Step 1. Start the simulation: You will be presented with 4 different modes: “Ten”, “Twenty”, “Game” and “Lab”. Open the “Ten” section. Step 2. You will see the following in the work area: Step 3. Place the number “1” on board 1 to place the items by holding down the left side of the mouse. Automatically, 1 puppy will appear on board 2. The number “1” will appear in the number box. Step 4. Place another number “1” on board 1. There will be 2 puppies on the 2nd board. The number box will show “2”. Step 5. Count the puppies in the same way, making numbers up to 10.  Step 6. Click the “reload” button and clear the boards. Replace the puppy with another object. For example, an apple. Step 7. Place the object (apple) on the 2nd board. The number 1 will automatically appear on the 1st board.  Step 8. You can draw some objects on the board and see the numbers on the 1st board. And the window will show the number of the object. Try this several times. Part 2. Working with Numbers 1-20 Step 9. Open the Twenty Section. In this section you will also work with numbers up to 20 as in Part 1. Step 10. Repeat the above steps (steps 3-8) for numbers 1-20 as you worked with numbers 1-10.  Part 3. The Game Step 11. Open the “Game” section. You will be given 4 different levels of the game. The first level will have tasks related to numbers 1-10, the second level will have tasks related to numbers 11-20, the third level will have tasks related to numbers 1-5, and the fourth level will have tasks related to numbers 6-10. Step 12. Open the first level. Some number of substances are represented in the workspace.  Step 13. Count these substances and mark the number corresponding to the quantity of the substance from the numbers below. Step 14. A button will appear on the screen to go to the next task, click it and go to the next task.  Step 15. There are 10 problems per level. You can go to the next level by completing the same tasks. Or you can replay the level with new tasks. Conclusion In this virtual activity, students have learned how to count objects. Learning numbers and counting is an important stage in a child’s development. The ability to count will be useful to children in everyday life and will also help them in their further study of mathematics.

Numbers. Counting objects Read More »

Areas of Figures

Objective: This virtual activity is designed to be used in the geometry lessons in the next chapter: Theoretical part Area is a quantitative measure of a two-dimensional surface. It represents the space occupied by a flat figure. Knowing the area of figures is important in several fields, including math, physics, engineering, architecture, and design. Formulas for calculating area: Each of the basic geometric figures has a formula for calculating its area: Ways to calculate area: Virtual Experiment The Area of Figures simulation teaches students how to find the area of a figure by counting unit squares. Describes the relationship between area and perimeter. Constructs figures with a given area and perimeter. Workflow: Step 1. Start the simulation: you will be offered 2 different modes, “Explore” and “Play”. Open the “Explore” section. Step 2. In the workspace you will find Step 3. Build the figure by drawing a row of unit squares on the board. Activate the button “Show shape size” on the board. Step 4. Look at the data on the board that shows area and perimeter. Examine how the area and perimeter of the figure are calculated. Step 5. Erase the board by clicking the eraser.  Step 6. Create a new figure on the board. Examine its area and perimeter. Step 7. Click the button to divide the workspace in half.  Step 8. Create two different shapes on two boards. Study their area and perimeter. Step 9. Try to create and study several figures in this way. Step 10. Open the “Game” section. You will be given tasks in the form of a game on 6 different levels. Open the first level. Step 11. In the workspace you will find: Step 12. The area of the figure to be built is set. Build the figure on its base. If necessary, you can add the buttons for displaying the grid and the size of the figure.  Step 13. Click on the Verify button to check that the figure is correct.  Step 14. Complete the tasks of the first level and move on to the next levels.  Conclusion Students have learned how to find the areas of figures of different irregular shapes. Made the connection between area and perimeter. Explored the topic of neighborhood by making shapes with a given area and perimeter.

Areas of Figures Read More »

Area of geometric figures

Objective: This virtual activity is designed for use in math lessons on the following topics: Theoretical part Area is a measure of the size of a plane figure. It is measured in square units, such as square centimeters (sq cm) or square meters (sq m). The area of a rectangle A rectangle is a quadrilateral whose angles are all right angles (equal to 90°) and whose opposite sides are equal in pairs. To find the area of a rectangle, multiply the length of its base (a) by its width (b). The formula is S = a * b Where: Example: Find the area of a rectangle with sides 5 cm and 3 cm: S = 5 cm * 3 cm = 15 square cm Area of a square A square is a rectangle with equal sides. To find the area of a square, you need to square its side (a). The formula is S = a² Where: Example: Find the area of a square with side 4 cm: S = 4 cm² = 16 square cm Virtual Experiment The Finding Area Model simulator helps students learn how to find the area of a rectangle. Gives the rectangle different dimensions and creates problems. Checks their understanding of the area model by finding the missing dimensions or total area in the game section. Course of Work: Step 1. Start the simulation: You will be presented with 3 different modes, Explore, Generic, and Game. You will work on this experiment in the Generic and Game sections. Open the Generic section. Step 2. You are presented with a workspace: Step 3. Click on one of the spaces next to the rectangle. A calculator will appear on the screen. Enter the length of the rectangle. Step 4. Enter the dimensions of the rectangle in the other 3 spaces. Step 5. Click on “a*b” to see the expression of the length and width of the rectangle.  Step 6. You can see the result of the area for each rectangle by clicking the “A” button.  Step 7. There are 2 views of the calculation panel. They show the calculation of the area.  In one of them you will see the expression step by step by clicking the “Next” button, and in the other you will see the complete calculation at once.  Step 8. Change the length and width of the rectangle and calculate the area again. Construct several expressions in this way. Step 9. Change the type of subdivision of the rectangle. Repeat the above steps.  Step 10. Open the “Game” section. You will be presented with games on 6 different levels. Select the first level. Step 11. In the workspace you will see Step 12. The game requires you to find the unknown number associated with the rectangle. Do the calculation and find the number. Step 13. Check if the expression is correct by clicking the Check button. Step 14. Continue playing the game. After completing one level, you can solve the problems in the next levels. Conclusion By creating this virtual activity, students can further develop their knowledge of the area. They perform different investigations on the area of a rectangle and create problems in a game-like way. This makes the lesson more fun and easier to learn.

Area of geometric figures Read More »

Decimal Multiplication

Objective: This virtual activity is designed for use in math lessons on the following topics Theoretical Part The rule for multiplying decimal fractions To multiply two decimal fractions, you must: Multiplying a decimal fraction by a whole number To multiply a decimal fraction by 10, 100, 1000, and so on. To multiply a decimal fraction by 10, 100, 1000, and so on, you must: Virtual Experiment The “Area Model: Decimals” simulation is designed to help students learn how to multiply decimals. Multiplication is learned by finding the area of a rectangle in the form of a Pythagorean table.  Workflow: Step 1. Start the simulation: in the workspace provided to you: Step 2. The table is divided into 10 parts. Each part represents 0.1, which is an integer of 1. The table represents a square of size 0.5*0.5. Divided horizontally into sections (0.2;0.3). The Multiplier Numbers panel and the Multiplication Results panel display the data. Click the button to color the square. Step 3. Click the “a*b” button from the square information in the table. The expressions 0.2*0.5 and 0.3*0.5 appear in the parts of the square.   Step 4. 2 views of the Calculation Panel are given. They show the calculation of the area of the square. In one of them you will see the expression step by step by clicking the “Next” button, and in the other you will see the complete calculation at once.  Step 5. Click on the “A” button of the square information in the table. The value of the expressions on the “a*b” button appears in the parts of the square.  Step 6. Explore the changes in the product by moving the divider up and down the square. Step 7. Move the horizontal divider up the square so that it does not divide the square. Move the vertical divider to the right. Examine the data. Observe the changes as you move the divider right and left. Step 8. Explore dividing the square into rectangles of different sizes by alternating the vertical and horizontal dividing lines in the square. Step 9. Create a new rectangle size by clicking on the green button next to the square. Explore the product of decimals. Step 10. Try to change the information about the quadrilateral in the table, the dividing lines. Step 11. You can change the size of the table to 2*2 and 3*3. Make the calculations by repeating the above steps. Change the dimensions of the rectangle and calculate the products. Conclusion In this virtual activity, students solve multiplication problems with decimal fractions using the area model. Multiplication in the Pythagorean table provides a visual way to learn the subject. This makes it easier to learn a new lesson.

Decimal Multiplication Read More »

Polynomials and Actions on Polynomials

Objective: This virtual activity is designed for use in mathematics lessons on the following topics Theoretical Part A polynomial is an algebraic expression consisting of one or more non-inomials connected by “+” or “-” signs. A polynomial is the product of a numerical coefficient, letter variables, and their degrees. The degree of a polynomial is the largest of the degrees of the variables that make up the polynomial. The terms of a polynomial are called its singletons. Similar terms of a polynomial are terms that have the same letter parts (i.e., the same variables in the same degrees). Example: -4x^2y^2 + a – 3: This is a 2nd degree polynomial with 3 terms. Standard form of a polynomial: Example: Write the polynomial: 3x^2 – 5x + 2 – x^2 + 4x – 1 into standard form. Solution:  Virtual Experiment The “Algebra with Area Model” simulation is designed for students to work on the topic of polynomials in algebra. For given dimensions of a rectangle, students specify individual terms and calculate the resulting polynomial.   Course of Work: Step 1. Start the simulation: You will be presented with 4 different modes, “Explore”, “Generic”, “Variables” and “Game”. You will work on this experiment in the “Variables” and “Game” sections. Open the “Variables” section. Step 2. You are given in the work area: Step 3. Click on one of the fields next to the square. A calculator will appear on the screen. Enter the uninomial.  Step 4. Type different uninomials in the other 3 spaces. Step 5. Click on “a*b” to see the expression for multiplying uninomials.  Step 6. You can see the result of multiplication of uninomials for each rectangle by clicking on “A”.  Step 7. 2 kinds of calculation tables are given. This shows the calculation of polynomials. If in one of them you will see the expression step by step by clicking the “Next” button, and in the other you will see the complete calculation at once.  Step 8. Change the values of the polynomial squared and calculate the polynomial again. Create several expressions in this way. Step 9. Change the way the square is divided. Repeat the above steps. Step 10. Open the “Game” section. You will be presented with games on 6 different levels. Select the first level. Step 11. In the work area you will be presented with Step 12. The game requires you to find the appropriate expression for the space inside the square. View the polynomial, perform the calculation, and find the expression. Step 13. Check if the expression is correct by clicking the Check button. Step 14. Continue playing the game. After completing one level, you can solve the problems in the next levels. Conclusion Students go deeper into the topic of polynomials by doing this virtual activity. It makes it easier to understand calculations by visualizing them on the screen. They can learn calculations in a fun and playful way.

Polynomials and Actions on Polynomials Read More »

Area. The unit of measurement of area

Objective: This virtual activity is designed for use in math lessons on the following topics: Theoretical part Area is a measure of how big a plane figure is. Simply put, it is how much space it takes up on the plane. How do we measure area? To measure area, we use special units of measurement called area units. The most common units of area are in square centimeters (cm²) and square meters (m²). Area of a square: To find the area of a square, you need to square its side. For example, if the side of a square is 4 cm, its area would be: 4 cm * 4 cm = 16 cm² Area of a rectangle: To find the area of a rectangle, you need to multiply its length by its width. For example, if the length of the rectangle is 5 cm and the width is 3 cm, then its area will be: 5 cm * 3 cm = 15 cm² Virtual experiment The simulation “Area. Unit of Area” will help students learn how to find the area of a rectangle. On the screen, they are introduced to the operation of multiplication in the form of a table. Manipulating the numbers, they get the results of multiplication. Course of Work: Step 1. Start the simulation: you will be presented with 2 different modes, “Multiply” and “Partition”. You will work on this experiment in the “Partition” section. Open the “Partition” section. Step 2. Given to you in the workspace: Step 3. The table presents a square of size 5*5. It is vertically divided into (2; 3) parts. The multiplier and multiplicand number board and the multiplication result board show the data. Click “a*b” from the rectangle information in the table. The expressions 5*2 and 5*3 appear on the parts of the square.  Step 4. Open the calculation panel. This shows the calculation of the area of the square. Because of the division by the vertical (2;3) part, the calculation is expressed as on the screen. Step 5. Click the “A” button from the rectangle information in the table. In the 10 and 15 parts of the square – the values of the expressions 5*2 and 5*3 appear.  Step 6. Swipe the divider you are dividing right, left across the square and examine the changes in the data. Step 7. Change the dividing line vertically to horizontal. Examine the data. Monitor the changes by moving the divider up and down. Step 8. Create a new rectangle size by clicking the green button next to the square. Examine the changes in the workspace.  Step 9. Try changing the rectangle information in the table, and the separator line. Step 10. You can change the size of the table to 12*12. Change the dimensions of the rectangle and calculate the squares. Conclusion In this virtual activity, students performed calculations related to area. Changing the size of the rectangle, dividing it into parts gave a deeper understanding of the subject.

Area. The unit of measurement of area Read More »

Finding the area of a rectangle and a square

Objective: This virtual activity is designed for use in mathematics lessons on the following topics Theoretical part Area is a measure of the size of a plane figure. It is measured in square units, such as square centimeters (sq cm) or square meters (sq m). The area of a rectangle A rectangle is a quadrilateral whose angles are all right angles (equal to 90°) and whose opposite sides are equal in pairs. To find the area of a rectangle, multiply the length of its base (a) by its width (b). The formula is S = a * b Where: Example: Find the area of a rectangle with sides 5 cm and 3 cm: S = 5 cm * 3 cm = 15 square cm Area of a square A square is a rectangle with equal sides. To find the area of a square, you need to square its side (a). The formula is S = a² Where: Example: Find the area of a square with side 4 cm: S = 4 cm² = 16 square cm Virtual Experiment The “Finding the area of a rectangle and a square” simulation helps students learn how to find the area of a rectangle. They learn how to use the area model to reason about the product of two numbers, that the product/area can be divided by smaller products/areas, and that the total area is equal to the sum of the partial areas. Course of Work: Step 1. Start the simulation: You will be presented with 3 different modes: “Explore”, “Generic” and “Game”. You will work on this experiment in the “Explore” section. Open the “Explore” section. Step 2. You are given a workspace: Step 3. The table displays a square of the size 10*10. Horizontally divided into sections (5;5). The Multiplier and Multiplier Numbers panels and the Multiplication Results panel show the data. Click the square coloring button. Click “a*b” from the square information in the table. The 5*10 expressions appear on the parts of the square. Step 4. There are 2 views of the calculation panels. These show the calculation of the area of the square. In one of them you will see the expression step by step by clicking the “Next” button, and in the other you will see the complete calculation at once.  Step 5. Click on the “A” button of the rectangle information in the table. The 50 – values of the 5*10 expressions appear in the parts of the square.  Step 6. Draw the divider you are dividing up and down the square and examine the changes in the data. Step 7. Move the horizontal dividing line up the square so that it does not divide the square. Move the vertical dividing line to the right. Examine the data. Trace the changes as you move the divider right, left. Step 8. Explore dividing the square into rectangles of different sizes by alternately moving the vertical and horizontal dividers in the square. Step 9. Create a new rectangle size by clicking the green button next to the square. Examine the changes in the work area.  Step 10. Try to change the information about the rectangle in the grid. Step 11. You can change the size of the table to 100*100. Change the dimensions of the rectangle and calculate the areas. Conclusion In this virtual activity, students performed calculations related to area. Changing the size of the rectangle and dividing it into parts gave them a deeper understanding of the topic.

Finding the area of a rectangle and a square Read More »

Multiplication and division

Objective: This virtual activity is designed to be used in math lessons in the next chapter: Theoretical part Multiplication Operation Imagine you are a baker and you want to bake lots of delicious pies. How many pies will you get if you use 2 cups of flour for each pie? That’s where multiplication comes to our rescue! Multiplication is the addition of identical groups. In our case: 1 pie = 2 cups of flour 2 pies = 2 cups of flour + 2 cups of flour = 4 cups of flour. 3 pies = 2 cups flour + 2 cups flour + 2 cups flour + 2 cups flour = 6 cups flour Let’s write it down like this: 2 x 3 = 6, where: 2 is the multiplier (what we are multiplying) – the amount of flour for 1 pie 3 is the multiplier (how many times we multiply) – the number of pies 6 is the product (the result of multiplication) – the total amount of flour. Division operation The more pies we bake, the more flour we use! Now let’s imagine that you have 8 delicious apples and you want to put them equally into 2 baskets. How many apples will be in each basket? Division will help us with that. Division is dividing a number into equal groups. In our case: 8 apples / 2 = 4 apples in each basket We write it like this: 8 : 2 = 4, where: 8 is the divisor (what we are dividing) – the total number of apples 2 is the divisor (how many groups we divide into) – the number of baskets 4 is the quotient (the result of division) – the number of apples in each basket. Let’s write it like this: 8 : 2 = 4, where: 8 is the divisor (what we are dividing) – the total number of apples 2 is the divisor (how many groups we divide into) – the number of baskets 4 is the quotient (the result of division) – the number of apples in each basket. The more apples, the more baskets with the same number of apples you get! Multiplication and division are like two sides of the same coin: Virtual experiment The “multiplication” simulation is an aid for students to familiarize themselves with the multiplication table. The screen introduces the multiplication operation in the form of the Pythagoras table. By manipulating the numbers, he gets the results of multiplication. Course of Work: Step 1. Start the simulation: you will be presented with 2 different modes, “Multiply” and “Partition”. You will work on this experiment in the “Multiply” section. Open the “Multiply” section. Step 2. Given to you in the work area: Step 3. The Pythagoras table shows the expression 1*1: 1*1=1. You can see the result of numbers up to 10 multiplied by 1 by left-clicking and moving to the right. For example, 1*5=5.  Step 4. You can see the expressions 1*9=9 in the multiplication and multiplication numbers pane and in the multiplication results pane. Step 5. Clean the table with an eraser. Step 6. Move the table down one unit. You have the expression 2*1: 2*1=2. You can see the result of numbers up to 10 multiplied by 2 by left clicking and moving to the right. For example, 2*7=14. You can see the expression information on the right side of the screen. Step 7. Clear the table with an eraser and move the table down two units. You have the expression 3*1: 3*1=3. Here you can see the result of numbers up to 10 multiplied by 3. For example, 3*4=12. On the right side of the screen, there are more details. Step 8. Thus, familiarize yourself with the multiplication table by moving the table down and to the right. The table shows the multiplier and the multiplier up to 10. So you can see the product 10*10=100. Step 9. If you change the size of Pythagoras table to 12*12, you can learn the product 12*12=144.  Step 10. You can learn the multiplication table by changing the numbers in the multiplier and multiplier number panel. The table automatically changes according to the multiplier and multiplicand. You can see the result of multiplication on the board. You can click show and hide the numbers in the table and not show the numbers.  Conclusion Students learn how to multiply using the Pythagoras table by doing this virtual activity. It will be interesting for students as they will work with the multiplication operation visually and make it easier to memorize the multiplication table.

Multiplication and division Read More »

Applying arithmetic operations to rational numbers

Objective: This virtual activity is designed to be used in math lessons in the next chapter: Theoretical part Addition and Subtraction: Identical symbols: Addition: When adding rational numbers with the same signs (e.g., + and +), add their numerators, keeping the sign. For example: 23+13=2+13=33=1 Subtraction: When subtracting rational numbers with the same signs (e.g., – and -), subtract their numerators, keeping the sign. For example: 54-24=5-24=34 Different Symbols: Addition: When adding rational numbers with different signs (e.g., + and – or – and +), subtract their numerators and keep the sign of the number that has the larger numerator. For example: 45+-25=4-25=25 Subtraction: When subtracting rational numbers with different signs (e.g., + and – or – and +), subtract their numerators and keep the sign of the first number. For example: 37–17=3+17=47 Multiplication and division: Same symbols: Multiplication: When multiplying rational numbers with the same signs (e.g., + and + or – and – and -), multiply their numerators and denominators. The sign of the result will be positive. For example: 23*45=2*43*5=815 Division: When dividing rational numbers with the same signs (e.g., + and + or – and – and -), divide the numerator of the first number by the numerator of the second number, and the denominator of the first number by the denominator of the second number. The sign of the result will be positive. For example: 5623=5*36*2=1512 Different Symbols: Multiplication: When multiplying rational numbers with different signs (for example, + and – or – and +), multiply their numerators and denominators. The sign of the result will be negative. For example: 34*-56=3*(-5)4*6=-1524 Division: When dividing rational numbers with different signs (for example, + and – or – and +), divide the numerator of the first number by the numerator of the second, and the denominator of the first by the denominator of the second. The sign of the result will be negative. For example: 79-23=7*(-2)9*3=-1427 Virtual experiment On the numbers screen, students perform arithmetic operations on rational numbers. This allows them to understand arithmetic functions by comparing them in different representations. Course of Work: Step 1. Start the simulation: you will be presented with 4 different modes: “Patterns”, “Numbers”, “Equations” and “Mystery”. You will work on this experiment in the “Numbers” section. Open the “Numbers” section. Step 2. You are given:  Step 3. Open the tables in the function machine. Step 4. Place an arithmetic operation on the function machine. You can add and subtract numbers 1-3, multiply by numbers 0-2, and divide by numbers 1-3. Step 5. Enter the incoming number into the function machine. The input panel shows the numbers (-4; 7). Step 6. You can see the number of inputs, function value and expression in the tables. The function value panel shows the value of the expression.  Step 7. Place another arithmetic operation on the function machine.  Step 8. Put an input number into the function machine. Examine the function data.  Step 9. Activate the button showing the value of the expression after each operation. Enter the number. After the first operation, the value of the expression is displayed.  Step 10. To perform the next operation, you pass the expression value to the next operation by holding down the left side of the mouse. Step 11. Change the data as you see fit and create different expressions. You can use the input numbers panel, operations. Conclusion This simulation allows students to interactively learn arithmetic operations with rational numbers. That is, students can create expressions on their own, modify them, and track changes in the results. Presenting numbers and techniques on the screen makes learning to read understandable and engaging. Overall, this simulation is a valuable tool for learning arithmetic operations with rational numbers. It can be used both as a supplement to traditional teaching methods and for independent research work.

Applying arithmetic operations to rational numbers Read More »