Statistical data: arithmetic mean, median
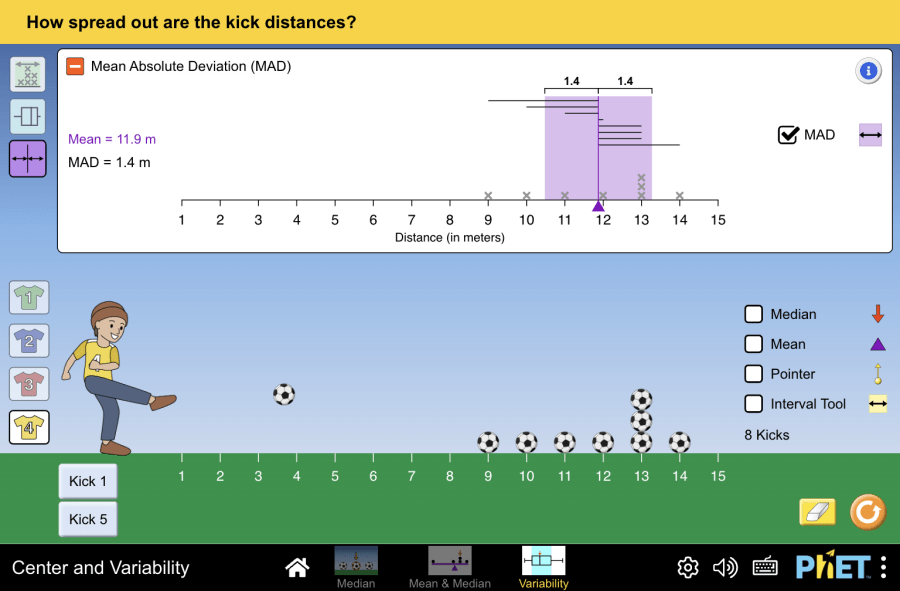
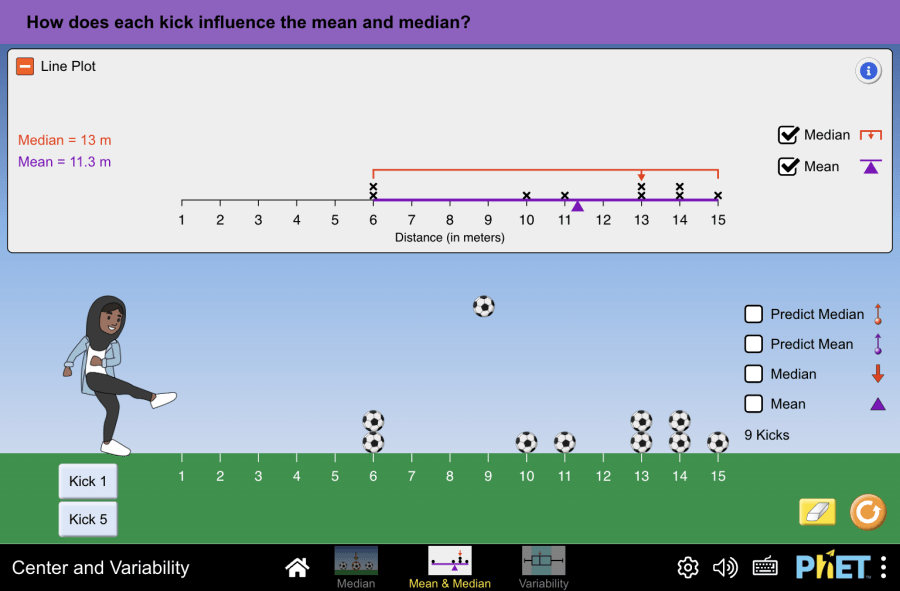
Center and Variability by PhET Interactive Simulations, University of Colorado Boulder, licensed under CC-BY-4.0 (https://phet.colorado.edu) Objective: This virtual activity is designed for use in math lessons on the following topics: Theoretical part Median The median is the number that is in the middle of an ascending-ordered list of numbers. If the number of numbers is even, the median is the arithmetic mean of the two center numbers. How to find the median: Example: Suppose we have a dataset of 5 height measurements of people: 170 cm, 175 cm, 180 cm, 185 cm, 190 cm. In a data set of 5 measurements of people’s height, the median is 180 cm. Arithmetic mean The arithmetic mean is a number that shows the average of all the numbers in a group. To find the arithmetic mean, you need to add up all the numbers and divide the resulting sum by the number of those numbers. Formula: Average = (Sum of all values) / (Number of values) Example: Suppose we have a data set of 5 measurements of people’s height: 170 cm, 175 cm, 180 cm, 185 cm, 190 cm. Average: (170 + 175 + 180 + 185 + 185 + 190) / 5 = 180 cm. Virtual Experiment This simulation allows students to explore the mean, the median, by working with small data sets with points far apart. Using the median screen, students can see how a data point affects the value of the median. In the mean and median screen, students compare the mean and median. They can see how they are affected by new points or the movement of individual points. Progression: Section 1: Median Step 1. Start the simulation: you will be given 3 different modes: ‘Median’, ‘Mean&Median’ and ‘Variability’. In this work, you will be working in the first two sections. Open the “Median” section. Step 2. In the work area you are provided with: Step 3. Add data sort, median, predict median and median buttons. Step 4. Press the hit the ball button 1 time. Examine the data. Step 5. Hit the ball 2 more times. Examine the data. Step 6. Delete the data. Step 7. Press the button to hit the ball 5 times. Examine the data. Section 2: Arithmetic Mean & Median Step 8. Open the Mean&Median section. In the work area you are provided with: Step 9. Enable the buttons in the area displaying the data and the predict median, predict mean, median, mean buttons. Step 10. Press the hit the ball button 1 time. Examine the data. Step 11. Hit the ball 2-3 more times. Examine the data. Step 12. Delete the data. Step 13. Press the button to hit the ball 5 times. Examine the data. Conclusion Two ways of evaluating data were explored in the simulation: the median and the arithmetic mean. Comparison of the median and the mean:
Statistical data: arithmetic mean, median Read More »