experimentum.kz

Virtual Natural Science

Greenhouse effect

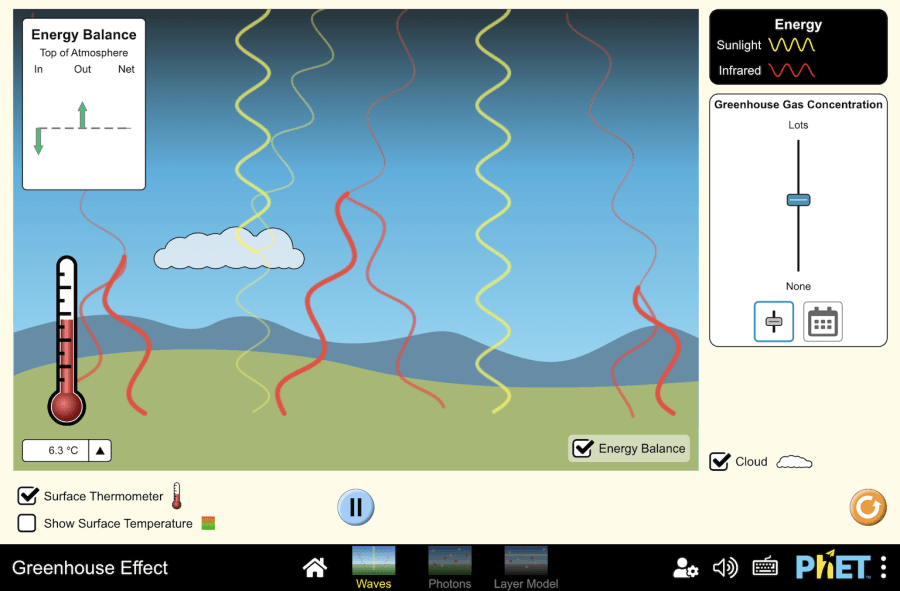
Objective: Virtual experiment: Virtual simulation illustrates the driving forces of the greenhouse effect without describing the effects of climate change. The model demonstrates the basic concept of the greenhouse effect by considering only two types of radiation: solar (visible) and infrared. It is important to note that this model does not include the effects of actual greenhouse gases. The figure below shows the functions that each button performs. Workflow: Step 1. When you enter the Greenhouse Effect virtual experiment, you will see three sections: “Waves”, “Photons”, and “Layer Model”. As part of this activity, you will need to select the “Waves” section and perform a number of experiments in this section. First, open the simulation and run a sunlight simulation. Step 2. Activate the buttons to display the energy balance and surface temperature. Step 3. Observe the temperature change with the surface thermometer and how sunlight and infrared light enter and exit the ground with the energy balance. Step 4. Increase the concentration of greenhouse gases. Increasing the concentration of greenhouse gases increases the likelihood of infrared absorption. Keep an eye on the changes. Step 5. Decrease the concentration of greenhouse gases. Observe the changes. Step 6. At the bottom of the “greenhouse gas concentrations” section is a “calendar”. Click the button and open the calendar. You have the time of the ice age, 1750, 1950, 2020. Step 7. You can see the impact of the greenhouse effect in 1750. Step 8. Change the calendar to the ice age. Keep track of the changes. Step 9. Change the calendar to 1950. Keep track of the changes. Step 10. Move the calendar to the year 2020. Keep track of the changes. Conclusion The relationship between surface temperature and greenhouse gas concentrations has been described.

Greenhouse effect Read More »

Properties of the state of a gas

Objective: Effect of changes in pressure, volume and temperature on other gas parameters Virtual experiment  In this virtual simulation, you can see the properties of gas particles: volume change, particle motion due to heat. This experiment is a continuation of the gas particle motion simulation, further revealing the properties of a gas. The figure below shows the functions that each button performs. Workflow: Step 1. When you enter the virtual experiment “properties of gas particles”, you have four different sections: ideal, exploration, energy, and diffusion. In this activity, you will choose the ideal section and conduct experiments in that section. Step 2. Display the ruler by specifying its width in the “Width” box (found in the parameter box). You can see that the initial width of the box is 10 nanometers. Step 3. Using the “add particles” tool, add the required number of particles to the box. The number of available particles is displayed in the “particles” section. You can monitor the temperature and pressure changes inside the box in the corresponding indicators. Step 4. Change the value of the “Constant” parameter from “nothing” to “Volume”. In this mode, the volume of the box will be fixed. Step 5. As you heat or cool the box, observe the changes in temperature and pressure. Step 6. Change the value of the “Constant” parameter to “Temperature”. The temperature will now be fixed and the other parameters will change as it changes. Step 7. Try resizing the box by increasing or decreasing its width. You will notice that when you compress, the volume decreases and the pressure increases, and vice versa, when you expand, the volume increases and the pressure decreases. Step 8. Change the value of the Constant parameter to Pressure. Step 9. By heating or cooling the box, observe the changes in temperature and volume. Step 10. Change the value of “Constant” parameter to the next type of “Pressure”. And in this mode, the pressures will be fixed. Step 11. Observe how the temperature and volume will change proportionally when the volume of the box changes (expansion or contraction). Step 12. If you wish, you can continue the experiment using other parameters available in the simulation. Step 13. As you change the parameters, observe the changes that occur in the box and with the parts and draw conclusions about the relationship between pressure, volume, and temperature. Conclusion. The virtual experiment demonstrated the changes that occur to gas particles when pressure, volume, and temperature are changed.

Properties of the state of a gas Read More »

Diffusion process

Objective: Virtual experiment  The Diffusion Simulator allows students to explore how two gases mix. Experiment with concentration, temperature, mass, and radius to determine how these factors affect the rate of diffusion. Use the center of mass and particle flow rate to determine when the system reaches equilibrium. The figure below shows the functions each button performs. Workflow: Step 1. Open the data section. Here you can track the particle count and temperature for each side. Step 2. Add additional data to the screen: Step 3. Place the particles in the box. Step 4. Remove the partition separating the box to begin the diffusion process. Turn on the stopwatch. Observe how long it takes for the particles to diffuse evenly inside the box. Step 5. Monitor the flow of particles between the sides using the scale below the box. Step 6. Repeat the diffusion process from the beginning, but with different parameter values for the particles. You can start the process again by pressing the orange colored button. Step 7. Change the blue particle parameters to your liking. Step 8. Change the red particle parameter values by setting different values than the blue particles. Step 9. Remove the divider separating the box to begin the diffusion process. Turn on the stopwatch. Observe how long it takes for the particles to diffuse evenly inside the box. Step 10. Monitor the flow of particles between the sides using the scale below the box. Step 11. Compare and analyze: Conclusion The simulator demonstrated the diffusion process between different gases and the effect of particle parameters on it.

Diffusion process Read More »

The motion of gas particles

Objective: To describe the motion of gas particles Effect of temperature on the motion of gas particles Virtual experiment  In this virtual experiment, you will observe the motion of gas particles and how they change when external forces are applied. The figure below shows the functions each button performs. Workflow: Step 1. When the virtual simulation is turned on, you have two sections: introduction and laws. Open the introduction section and you will start working there. Step 2. Click on the “particles” button and open “particle types”. Two types of particles are given: heavy and light. Step 3. Display the stopwatch on the screen and the collision counter on the wall, noting the parameter readings. You can see that the width of the box is 10 nanometers by clicking the “width” button. Step 4. Change the units of temperature and pressure. Convert K to ºC, atm to kPa. Step 5. Insert the parts into the box using the part insertion tool. The blue particles are heavier. You can see how many of them there are in the particles section. And you can track the temperature and pressure changes inside the box. Step 6. You can see the number of times the particles hit the wall in 10 ps (picoseconds) by connecting a collision counter to the wall. Step 7. Heat the box. Monitor changes in temperature and pressure. Step 8. Again count the number of times the particles hit the wall by connecting the collision counter to the wall. Step 9. Now let the box cool down. Monitor changes in temperature and pressure. Step 10. Try to count the number of times the particle hits the wall. Step 11. Clear the box of particles using the clean button at the bottom. Step 12. Try repeating the steps above, selecting lighter (red) particles. Step 13. Try comparing the heavy and light particles. You can see that the lighter particles have a higher velocity than the heavier particles.  Conclusion With the virtual experiment, you were able to observe the motion of gas particles and the effect of temperature on it.

The motion of gas particles Read More »

Description of the pH environment of the solution

Objective: To describe the pH environment of a solution Expected Outcomes: Determining whether a solution is an acidic, neutral, or alkaline medium Virtual experiment  The figure below shows the functions each button performs. Workflow: Step 1. When you enter the virtual experiment “describing the pH environment of a solution”, you have three different sections: macro, micro, and my solution. In this activity, you will choose the macro section and conduct your experiments in that section. Step 2. Choose the type of solution. (For example, water.) Step 3. Determine the pH of the solution medium using the pH scale. (pH=7) Step 4. Select the next type of solution. Step 5. Determine the pH of the solution medium using the pH scale. Step 6. Pour the solution into a bowl. Step 7. Determine the pH of the solution. Are there any changes? Why? Step 8. Dilute by pouring water into the solution. Step 9. Determine the pH of the solution. Are there any changes? Why? Step 10. You can choose other types of grout and repeat the above steps. Conclusion While creating the virtual work, it was discovered that each solution has its own pH environment.

Description of the pH environment of the solution Read More »