experimentum.kz

virtual physics

Slits experiments

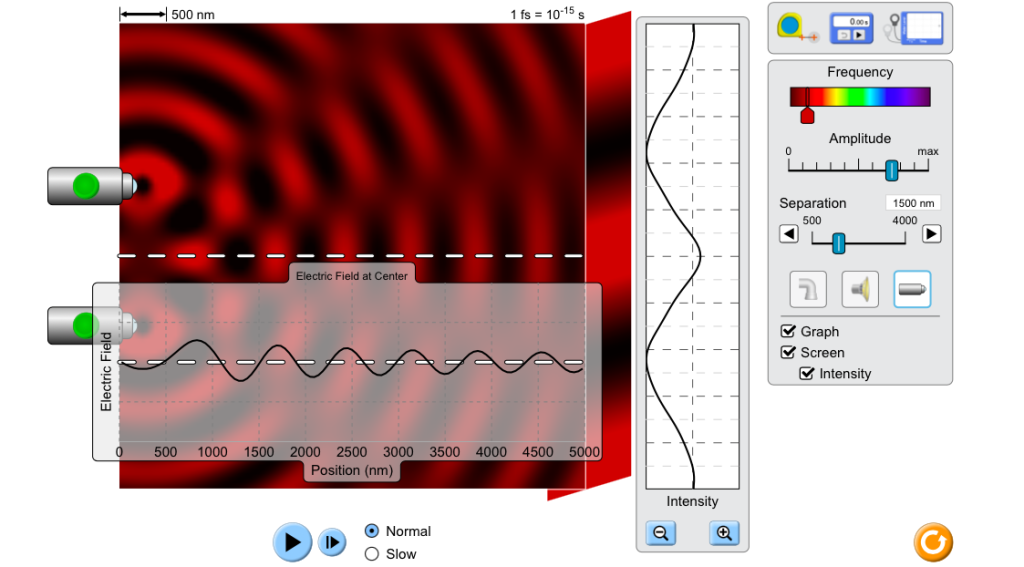
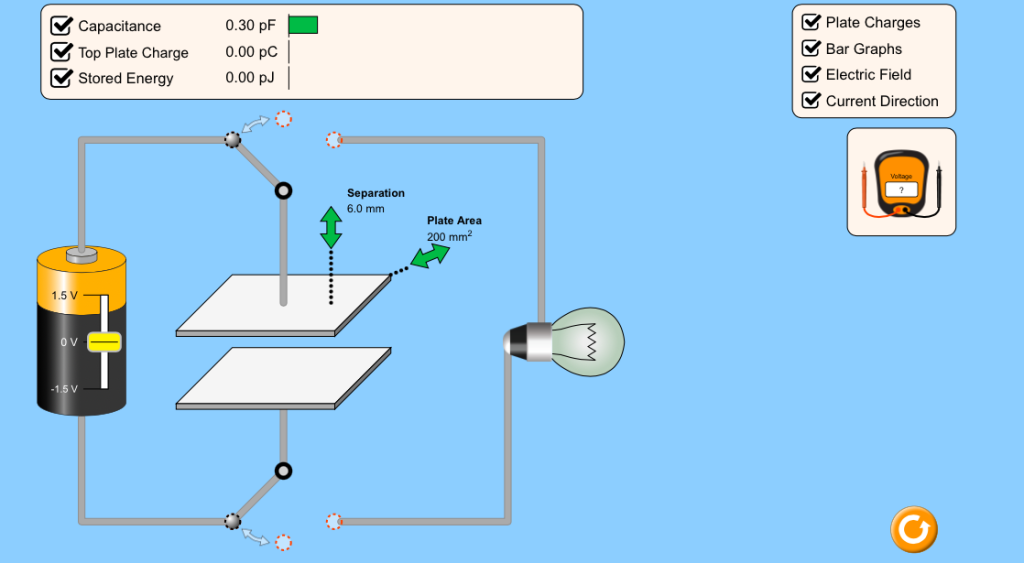
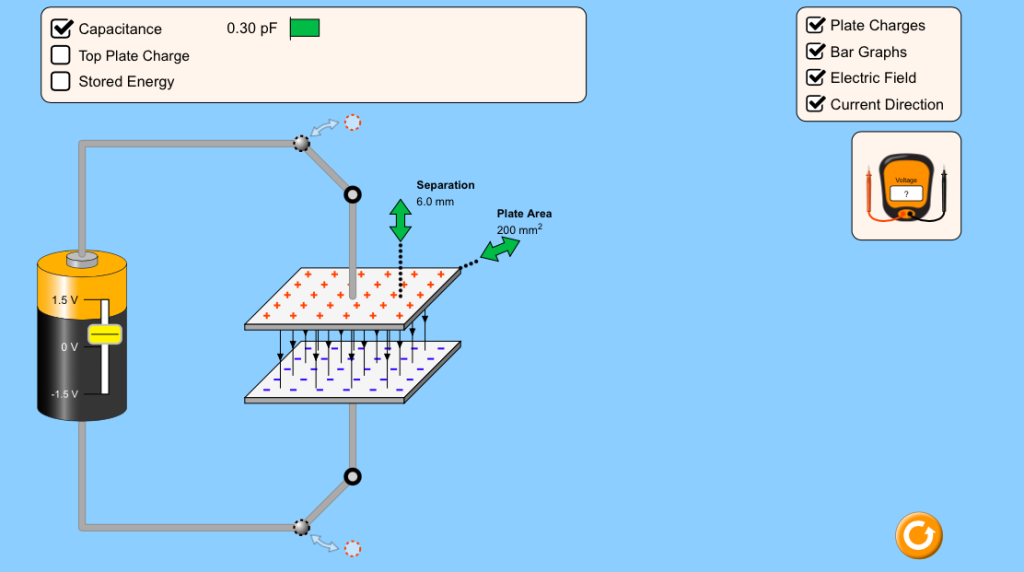
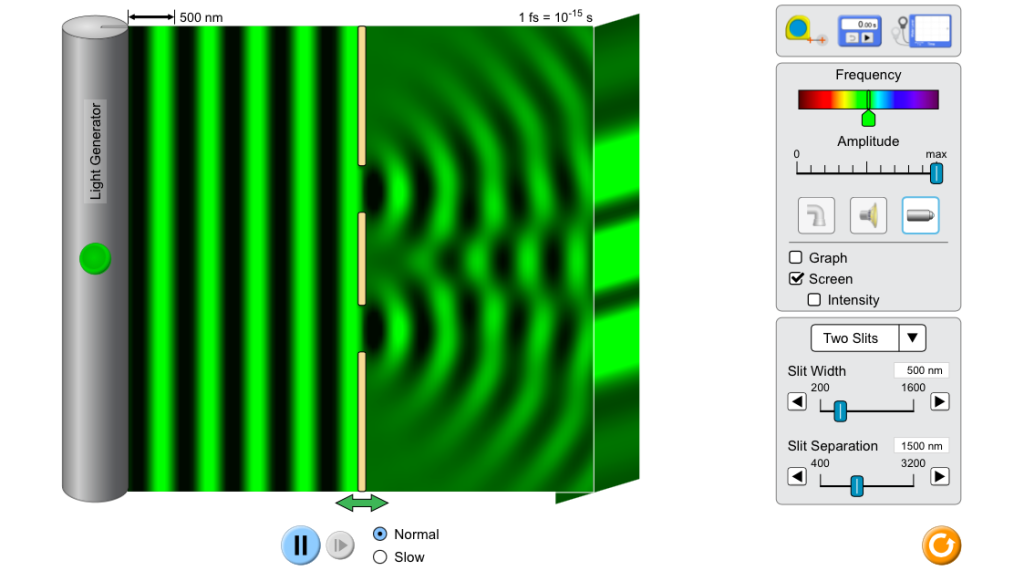
The title of the Project: Slits experiments Purpose of the work: Practical part Choose “Slits” to start the virtual experiment.  This is a little instruction to the virtual experiment. Virtual experiment. Step 1. Choose the settings as shown in the photo. Step 2. Turn the laser on. Notice what happens after the wave go through the slit.  Step 3. Change the setting to two slits. Turn on the laser. Notice what happens after the wave go through the slits.  Step 4. Increase the width of the slits. What happens? Step 5. Decrease the width of the slits. What happens? Step 6. Increase the separation between the slits. What happens?  Step 7. Decrease the separation between the slits. What happens? Step 8. Make a conclusion.  Conclusion For the experiment with a single slit, there is a diffraction phenomenon takes a place, when the light goes through the slit. For the experiment with double slits, there is diffracting taking place and then interference of the resulting waves. On the screen we can see that the interference patterns change when we change the separation between the slits and the width of the slits. 

Slits experiments Read More »

Interference

The title of the Project: Interference Purpose of the work: Practical part Choose “Interference” to start the virtual experiment. This is a little instruction to the virtual experiment. Virtual experiment. Step 1. Choose the settings as shown in the photo. Step 2. Turn on the lasers. Notice the patterns on the screen. Step 3. Decrease the frequency. How do patterns change? Step 4. Increase the frequency. How do patterns change? Step 5. Decrease the separation between the lasers. How do patterns change? Step 6. Increase the separation between the lasers. How do patterns change? Step 7. Make a conclusion.  Conclusion Interference is when 2 or more waves form a resultant wave. Interference can be constructive or destructive. On the screen the patterns tell us if the interference was constructive or destructive. If there is a dark line, the two waves canceled each other and resulted in destructive interference. If there is a bright line, the two wave reinforced each other and resulted in constructive interference. 

Interference Read More »

Diffusion

The title of the Project: Diffusion Purpose of the work: Practical part This is a little instruction to the virtual experiment. Part 1. Number of particles Virtual experiment. Step 1. Change the settings as shown in the photo. Step 2. Set equal number of particles. Remove the divider and see how much time it takes for full diffusion. Use stopwatch. Step 3. Increase the number of particles. Remove the divider and see how much time it takes for full diffusion. Use stopwatch. Compare to the previous results. Step 4. Make a conclusion. Part 2. Temperature Virtual experiment. Step 1. Increase the initial temperature. Remove the divider and see how the time changed. Use stopwatch. Compare to the previous results. Step 2. Decrease the initial temperature. Remove the divider and see how the time changed. Use stopwatch. Compare to the previous results. Step 3. Make a conclusion. Conclusion The rate of diffusion depends on the initial temperature, the higher the temperature the faster the diffusion goes. And it depends on the number of particles, the more particles the slower the diffusion takes place.

Diffusion Read More »

Pendulum, energy conservation

The title of the Project: Pendulum, energy conservation Purpose of the work: Practical part Choose “Energy” to start the virtual experiment.  This is a little instruction to the virtual experiment. Virtual experiment. Step 1. Choose the settings as depicted in the photo.  Step 2. Release the pendulum at 90 degrees to the normal and notice how the energies change. Does the sum of potential and kinetic energies exceed the total energy at any moment?  Step 3. Start again. Increase the friction. Release the pendulum at 90 degrees to the normal and notice how the energies change. Does the sum of potential, kinetic and thermal energies exceed the total energy at any moment?  Step 4. Make a conclusion.  Conclusion The energy conservation law states that energy doesn’t disappear and appear out of nowhere, it only transforms from one type to another. In this simulation the potential energy transformed first to kinetic energy and then to kinetic and thermal energies. 

Pendulum, energy conservation Read More »

Pendulum

The title of the Project: Pendulum Purpose of the work: Practical part Choose “Intro” to start the virtual experiment.  This is a little instruction to the virtual experiment. Part 1. Length Virtual experiment. Step 1. Set the parameters as shown in the photo. Step 2. Using the stopwatch count the period for the given length.  Step 3. Increase the length. Using the stopwatch count the period again. Compare the results. Step 4. Decrease the length. Using the stopwatch count the period again. Compare the results. Step 5. Make a conclusion.  Part 2. Mass Virtual experiment. Step 1. Increase the mass of the pendulum. Using the stopwatch count the period. Compare the results with the previous one.  Step 2. Decrease the mass of the pendulum. Using the stopwatch count the period. Compare the results. Step 3. Make a conclusion.  Part 3. Gravitational acceleration Virtual experiment. Step 1. Increase the gravitational acceleration. Using the stopwatch count the period. Compare the results with the previous one. Step 2. Decrease the gravitational acceleration. Using the stopwatch count the period. Compare the results. Step 3. Make a conclusion. Conclusion The period of the pendulum is directly proportional to the length of the pendulum, inversely proportional to the gravitational acceleration and doesn’t depend on the mass.

Pendulum Read More »

Energy stored by the capacitor

The title of the Project: Energy stored by the capacitor Purpose of the work: Practical part Choose “Light bulb” to start the virtual experiment.  This is a little instruction to the virtual experiment. Virtual experiment. Step 1. Choose the settings as shown in the picture. Step 2. Increase the capacitance. What happens? The charge on the plates of the capacitor increases as well as the energy stored by the capacitor. Connect the wires to the light bulb.  Step 3. Connect the wires back to the battery. Decrease the capacitance. What happens? Connect the wires to the light bulb. Step 4. Connect the wires back to the battery. Increase the voltage. What happens? The charge on the plates and the energy stored by the capacitor increases too. Connect the wires to the light bulb.  Step 5. Connect the wires back to the battery. Decrease the voltage. What happens? Connect the wires to the light bulb.   Step 6. What happens if the voltage becomes negative? Make a conclusion. Conclusion The energy stored by the capacitor is proportional to the voltage on the edges and the charge on the plates. While the charge accumulated on the plates of the capacitor depends on the capacitance. When the voltage becomes negative the plates of the capacitor change sign of the charge.

Energy stored by the capacitor Read More »

 Capacitors

The title of the Project: Capacitors Purpose of the work: Practical part Choose “Capacitance” to start the virtual experiment.  This is a little instruction to the virtual experiment. Virtual experiment. Step 1. Increase the overlapping area of the plates of the capacitor. How does the capacitance change?  Step 2. Decrease the distance between the plates. How does the capacitance change? Step 3. Decrease the overlapping area of the plates of the capacitor. How does the capacitance change? Step 4. Increase the distance between the plates. How does the capacitance change? Step 5. Make a conclusion. What is the minimum possible capacitance? What is the maximum possible capacitance?  Conclusion Capacitance depends on the overlapping area of the plates and the distance between the plates of the capacitor. Capacitance is directly proportional to the area and inversely proportional to the distance between the plates. Lastly the minimum capacitance is 0.09 pF, and the maximum capacitance is 1.77 pF. 

 Capacitors Read More »

 Concept of density

The title of the Project: Concept of density Purpose of the work: Practical part Choose “Intro” to start the virtual experiment.  This is a little instruction to the virtual experiment. Virtual experiment. Step 1. Change the settings for customized density. This way the density can be adjusted, and it will allow to understand what it is density. Step 2. Increase the mass of the object. How does density change?  Step 3. Decrease the volume of the object. How does density change?  Step 4. Decrease the mass of the object. How does density change?  Step 5. Increase the volume of the object. How does density change?  Step 6. Make a conclusion.  Conclusion The density of the object shows how much of the mass is in the provided volume. In other words, the density is directly proportional to the mass of the object and is inversely proportional to the volume of the object.

 Concept of density Read More »

Coulomb’s law

The title of the Project: Coulomb’s law Purpose of the work: Practical part Choose “Macro Scale” to start the virtual experiment.  This is a little instruction to the virtual experiment. Part 1. Charge dependence of the electrostatic force Virtual experiment. Step 1. Increase the charge of the first body. How does the force change?  Step 2. Increase the charge of the second body. How does the force change? Step 3. Decrease the charge of the first body. How does the force change? Step 4. Decrease the charge of the second body. How does the force change? Step 5. Make a conclusion. Part 2. Distance dependence of the electrostatic force Virtual experiment. Step 1. Increase the distance between the bodies. How does the force change?  Step 2. Decrease the distance between the bodies. How does the force change? Step 3. Make a conclusion.  Conclusion According to Coulomb’s law the electrostatic force is directly proportional to the product of the charges and inversely proportional to the square of the distance.

Coulomb’s law Read More »

Black body radiation

The title of the Project: Black body radiation Purpose of the work: Practical part This is a little instruction to the virtual experiment. Virtual experiment. Step 1. Choose the settings depicted in the photo below. Step 2. Increase the temperature. Notice that as you increase the temperature the peak of the graph becomes out of the scope, so adjust the scale accordingly. How does the wavelength change? Spectral power density? Press the camera button to save the graph.  Step 3. Decrease the temperature. Adjust the scale if needed. How does the wavelength change? Spectral power density? Press the camera button to save the graph.  Step 4. Make a conclusion.  Conclusion The power of black body radiation increases with the temperature. Whereas the wavelength of the radiation decreases with the temperature. 

Black body radiation Read More »