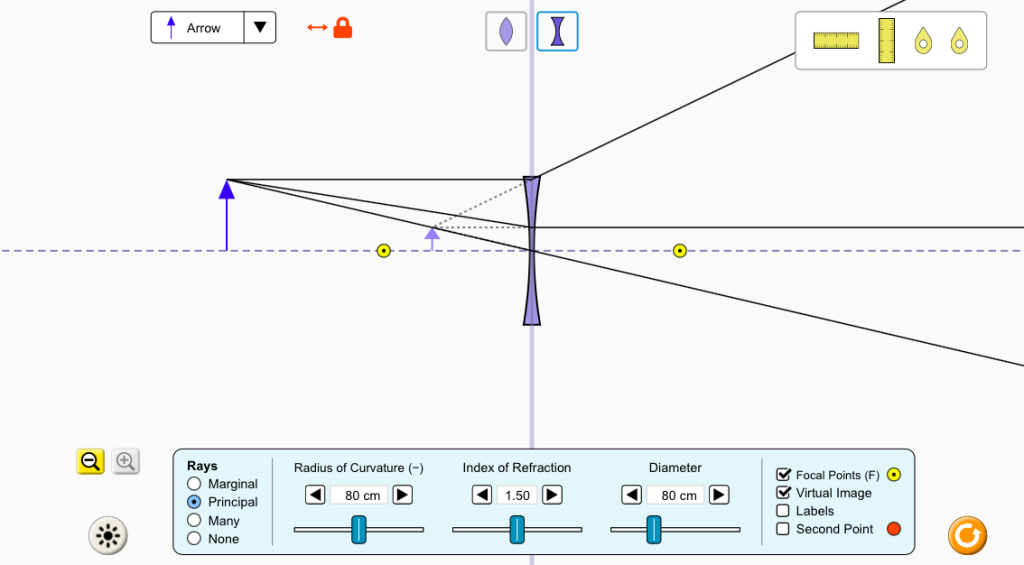
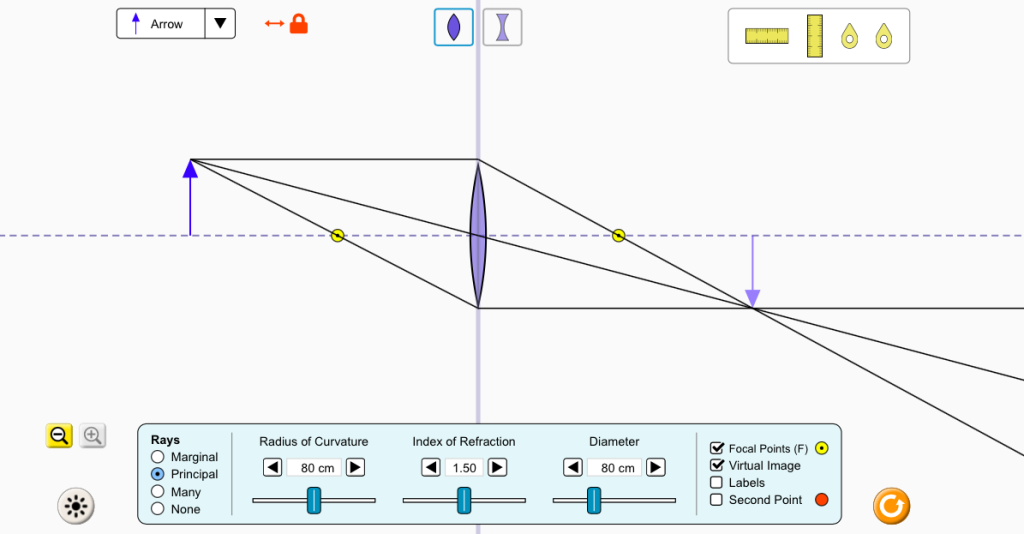
experimentum.kz

virtual physics

Convex lens

The title of the Project: Convex lens Purpose of the work: Practical part Choose “Lens” to start the virtual experiment.  This is a little instruction to the virtual experiment. Virtual experiment. Step 1. Choose settings at shown in the picture below. Step 2. Put the object outside of the focal point. Describe the image. The image is inverse, real, and larger than the object.  Step 3. Put the object onto the focal point. There is no image in this case. The rays do not focus.  Step 4. Put the object between the focal point and the lens. Describe the image. The image is upright, virtual, and larger than the object. Step 5. Make a conclusion. Conclusion The images from the convex lens change depending on the position relative to the focus point.

Convex lens Read More »

Concave lens

The title of the Project: Concave lens Purpose of the work: Practical part Choose “Lens” to start the virtual experiment.  This is a little instruction to the virtual experiment. Virtual experiment. Step 1. Choose settings at shown in the picture below. Step 2. Put the object outside of the focal point. Describe the image. The image is upright, virtual, and smaller than the object.  Step 3. Put the object onto the focal point. Describe the image. The image is upright, virtual, and smaller than the object.   Step 4. Put the object between the focal point and the lens. Describe the image. The image is upright, virtual, and smaller than the object. Step 5. Make a conclusion. Conclusion Images from concave lenses are always the same, namely, they are upright, virtual, and smaller than the object.

Concave lens Read More »

Total internal reflection

The title of the Project: Total internal reflection Purpose of the work: Practical part Choose “Intro” to start the virtual experiment.  This is a little instruction to the virtual experiment. Virtual experiment. Step 1. Turn on the laser. Position the protractor along the normal line. Step 2. Place the instrument for measurement the intensity on the reflected ray.  Step 3. Increase the index of refraction of the incidence medium. Gradually decrease the index of refraction of the refraction medium. What happens?  Step 4. Notice that at some point the intensity of the reflected ray became 100%. It is called total internal reflection. Make a conclusion. Step 5. Increase the angle in incidence. What happens? The intensity of the reflected ray is still 100%.  Step 6. Decrease the angle of incidence. What happens? At some point some part of the ray gets refracted. The angle at which it happens is called the critical angle.  Step 7. Make a conclusion. Conclusion There are two conditions for the total internal reflection to happen. First, the incidence medium must be denser than the refraction medium. Second, the incidence angle must greater than the critical angle. The critical angle can be found by taking arcsinus of refractive index of the second medium divided by the refractive index of the first medium (medium of incidence). 

Total internal reflection Read More »

The law of refraction

The title of the Project: The law of refraction Purpose of the work: Practical part Choose “Intro” to start the virtual experiment.  This is a little instruction to the virtual experiment. Part 1. Angle Virtual experiment. Step 1. Turn on the laser. Position the protractor along the normal line.  Step 2. Measure the angle between the normal line and the refracted ray. This is the angle of refraction. Step 3. Increase the angle of incident ray. What happens? The refracted angle increases. Step 4. Decrease the angle of incident ray. What happens? The refracted angle decreases. Step 5. Make a conclusion.  Part 2. Index of refraction Virtual experiment. Step 1. Increase the index of refraction of the incident ray medium. What happens? The refracted angle increases.  Step 2. Decrease the index of refraction of the incident ray medium. What happens? The refracted angle decreases. Step 3. Increase the index of refraction of the refracted ray medium. What happens? The refracted angle decreases. Step 4. Decrease the index of refraction of the refracted ray medium. What happens? The refracted angle increases. Step 5. Make a conclusion.  Conclusion The refraction angle depends on the incident ray angle and on the index of refraction of both mediums, incident and refracted. The refraction angle is directly proportional to the incident way angle and the index of refraction of the incident ray medium and is inversely proportional to the index of refraction of the refracted ray. This can be summarized into Snell’s law, which states that the product of sinus of the incident ray angle and the index of refraction of the incident medium is equal to the product of sinus of refraction angle and the index of refraction of refracted angle. 

The law of refraction Read More »

The law of reflection

The title of the Project: The law of reflection Purpose of the work: Practical part Choose “Intro” to start the virtual experiment.  This is a little instruction to the virtual experiment. Virtual experiment. Step 1. Turn on the laser. Take the protractor and place it along the normal line to the surface. Step 2. Measure the angle between the incident ray and the normal line. This is the angle of incident ray. Step 3. Measure the angle between the reflected ray and the normal line. This is the angle of reflection. Step 4. Notice that these angles are the same.   Step 5. Change the angle of incident ray. Does the reflected angle change?  Step 6. Increase the index of refraction from the incident ray side. Does the reflected angle change?  Step 7. Make a conclusion.   Conclusion The law of reflection states that the angle of incident ray is equal to the angle of the reflected ray.

The law of reflection Read More »

Faraday’s law 

The title of the Project: Faraday’s law  Purpose of the work: Practical part This is a little instruction to the virtual experiment. Virtual experiment. Step 1. Turn on the voltmeter and field lines of the magnet. Step 2. Pass the magnet through the coil. What happens? Step 3. Notice that the voltmeter records voltage only when the magnet enters and exits the coil. This is when the magnetic field changes and induces electromotive force (emf).  Step 4. Switch to 2 coils. Pass the magnet though the coil with a smaller number of turns.  Step 5. Pass the magnet though the coil with a bigger number of turns. What is the difference? Step 6. Change the polars of the magnet. What happens? The magnetic field changes and this change induces emf. Step 7. Make a conclusion. Conclusion The Faraday’s law of induction states that changes in magnetic field induces emf. The electromotive force is directly proportional to the number of turns of the coil.

Faraday’s law  Read More »

Energy conservation law

The title of the Project: Energy conservation law Purpose of the work: Practical part Choose “Intro” to start the virtual experiment.  This is a little instruction to the virtual experiment. Virtual experiment. Step 1. Turn on the visualization options by clicking the checkboxes. Turn on slow motion.  Step 2. Let the skater begin from 6 m height point. Notice that when the skater is at the highest point, its total energy is equal to the potential energy.  Step 3. Notice that when the skater is at the lowest point, its total energy is equal to the kinetic energy and its speed reaches the maximum value.  Step 4. Notice that when the skater is in the middle point, its total energy is equal to the sum of kinetic energy and potential energy. Step 5. Notice that the total energy doesn’t exceed the value of the highest potential energy.  Step 6. Let the skater begin from 4 m height point. What happens?  Step 7. Make a conclusion.  Conclusion The total energy is the sum of kinetic and potential energy. The total energy is constant. Energy doesn’t disappear and doesn’t appear from nowhere; it only transforms from one kind to another.

Energy conservation law Read More »

Lever balance

The title of the Project: Lever balance Purpose of the work: Practical part Choose “Intro” to start the virtual experiment.  This is a little instruction to the virtual experiment. Virtual experiment. Step 1. Place the same objects on the same distance on the lever. Take away columns. What happens?  Step 2. Put the columns back. Change the object for a bigger one on the right side on the same distance. Take away columns. What happens? Step 3. Put the columns back. Change the position of the bigger object. Put it twice closer. Take away columns. What happens? Step 4. Make a conclusion.  Conclusion Level balance condition: the force acting on one arm times the distance from the hinge point should be equal to the product of the force and the distance from the hinge point on the other arm.

Lever balance Read More »

Hydrostatic pressure

The title of the Project: Hydrostatic pressure Purpose of the work: Practical part Choose the first window to start the experiment.  This is a little instruction to the virtual experiment. Part 1. Height Virtual experiment. Step 1. Place manometer at the bottom of the dish. Turn on the grid. Step 2. Start pouring water into the dish until it reaches the edges. How does the pressure change as the height of the water level increases?  Step 3. Open the tap to pour the water out of the dish. How does the pressure change as the height of the water level decreases? Step 4. Make a conclusion. Part 2. Density Virtual experiment. Step 1. Increase the density of the fluid. How does the pressure change?  Step 2. Decrease the density of the fluid. How does the pressure change? Step 3. Make a conclusion. Part 3. Gravitational acceleration Virtual experiment. Step 1. Increase the gravitational acceleration. How does the pressure change?  Step 2. Decrease the gravitational acceleration. How does the pressure change? Step 3. Make a conclusion. Conclusion The hydrostatic pressure is directly proportional to the height of the level of fluid, the density of the fluid and the gravitational acceleration. 

Hydrostatic pressure Read More »

Atomic and mass numbers

The title of the Project: Atomic and mass numbers Purpose of the work: Practical part Choose “Symbol” to start the virtual experiment.  This is a little instruction to the virtual experiment.  Part 1. Atomic number Virtual experiment. Step 1. Build a lithium atom. It has 3 protons, 4 neutrons and 3 electrons. The number of electrons and protons in an atom is the same, but the number of neutrons may vary.  Step 2. Notice that the number of protons coincides with the number in the lower left corner of the element symbol. It is the atomic number (Z) of the element. Step 3. Note that the atomic number is the number of charges of the atomic nucleus, or the number of protons. The atomic number corresponds to the order in the periodic table. Step 4. Make a conclusion.  Part 2. Mass number Virtual experiment. Step 1. Notice that the sum of protons and neutrons coincides with the number in the upper left corner of the element symbol. It is the mass number (A) of the element. Step 2. Note that the mass number of the element is the number of nucleons of that element.  Step 3. Make a conclusion. Conclusion The atomic number is the number of charges of the atomic nucleus, or the number of protons. The mass number is the number of nucleons, or the sum of protons and neutrons.

Atomic and mass numbers Read More »